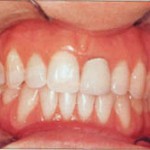
Figure 1. Preoperative maxillary left central incisor crown with dark gingiva.
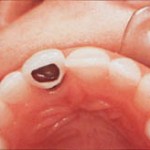
Figure 2.Displacement of the crown due ro the root fracture.
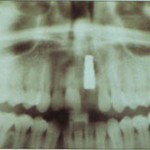
Figure 3. Radiograph of dental implant in place.
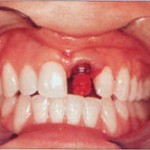
Figure 4. Immediate impression using a transfer coping.
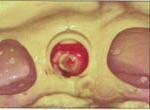
Figure 5. Transfer cap picked up into impression to stabilize transfer coping for laboratory procedures.
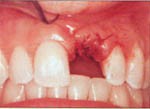
Figure 6. Suturing of site, maintaining the interdental papilla.
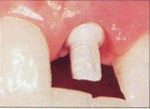
Figure 7. Plastic abutment in place to be used as temporary abutment.
Optimizing aesthetics in the anterior maxillary region can be difficult even in the best situations. When a patient is forced to lose a tooth because of periodontal disease or trauma, the final restoration can be compromised. For many years, dental implants have provided practitioners with another option in restoring edentulous spaces. With the advent of smile design philosophies, there have been tremendous strides in the development of prosthetic components to maximize emergence profile and stability of implants.
Restoring a single tooth provides some unique challenges to dentists. Single porcelain veneers or conventional porcelain-fused-to-metal or full-porcelain crowns can be aesthetically difficult. Often, dentists may choose to restore adjacent teeth to maximize the result. Porcelain-fused-to-metal limits reflection and absorption of light, often leaving a less-than-ideal restoration and sometimes complications of darkness at the gingiva. Fortunately, manufactures are creating new products and materials that offer better aesthetics.
Dental implants are an excellent alternative to conventional techniques. Three-unit bridges can now be replaced with single-tooth dental implants, which currently provide outstanding and function. Many of the problems associated with dental implant prosthetics have been eliminated. Internal hex designs, taller external hex designs, torque-driven screws, and better implant diagnosis and placement have eliminated screw loosening. Anatomic abutments allow for better tissue adaptation. Tissue control and maintenance are important considerations in designing an implant restoration. Visualizing the finished case before any surgical intervention is very critical. Computer programs such as Simplant (Columbia Scientific), are useful tools for ideal implant placement and angulation. Diagnostic wax-ups, surgical stents, and comprehensive discussions with the patinet concerning their expectations help create an acceptable and often outstanding result.
Materials
The Frialit-2 (Friatec) dental implant system was used in the replacement of a fractured maxillary left central incisor.. Procera materials were used for the crown fabrications.
This dental implant system maintains the stepped-cylinder concept of the Tubingen implant used, and clinically documented since 1976(1) Introduced in 1992, the system converts the implant process into a 2-stage surgical procedure, optimizing immediate implant opportunities. It also offers prefabricated superstructure components that yield optimum function and aesthetics. Other advantages include reliable implantation and osseointegration, excellent engineering, optimum aesthetics, and increased treatment compliance with oral hygiene maintenance.
Case Study
A 28-year-old female presented to the office with a symptomatic maxillary left central incisor. The tooth had been endodontically treated and restored with a cast post and core and porcelain-fused-to-metal crown. The patient did very well for many years until the root fractured, resulting in displacement (Figures 1 and 2). A 3-unit conventional bridge from the right central incisor to the left lateral incisor., and an acid-etch bridge, and a removable partial appliance or partial appliance or a single-tooth implant replacement were options discussed. The patient opted for the single-tooth implant replacement because she preferred to have the unrestored adjacent teeth prepared and did not want any removable appliances.
The first surgical stage involved extraction of the fractured root and implantation. The dental implant system chosen offers four different implant diameters corresponding to the different cervical anatomic contours and dimensions. It also has anadontically oxidized color-coded components. The surgical system includes 2- and 3-mm diameter spiral drills, a 3.8mm diameter round bur, and stepped drills corresponding in diameter and length to the implants. The drills are internally and externally irrigated. A clear prefabricated surgical template (or stent) was fabricated to direct implant placement.
The first surgical stage involved extraction of the fractured root and implantation. The dental implant system chosen offers four different implant diameters corresponding to the different cervical anatomic contours and dimensions. It also has anadontically oxidized color-coded components. The surgical system includes 2- and 3-mm diameter spiral drills, a 3.8mm diameter round bur, and stepped drills corresponding in diameter and length to the implants. The drills are internally and externally irrigated (2). A clear prefabricated surgical template (or stent) was fabricated to direct implant placement.
The tooth was extracted and the implant was immediately placed. The remaining socket was obliterated by the 5.5 mm diameter implant. This implant is conically shaped, widest at the crest, and narrows apically, which is very similar to the tooth it is replacing (Figure 3) No releasing incisions were made to protect the interdental papillas.
Immediately, a color coded transfer coping (impression coping) was inserted into the interhexagon of the implant with a coping screw. The two flat parallel surfaces on the transfer coping exactly transferred to position of the hexagon. A circumferential grove ensured that it was repositioned correctly in the vertical dimension. Figure 4 shows the placement of a corresponding color-coded transfer cap (red indicates a 5.5 diameter implant). This allowed for better transfer of the impression coping back into the impression (Figure 5).
A vinyl polysiloxane medium-body impression material was placed around the impression coping, and a heavy body material was placed whithin the tray. The firm impression material provided a highly accurate impression. The sealing screw was threaded back into position, and the area was sutured. Maintenance of the interdental papilla in the case was critical to the aesthetics (Figure 6).
One of the primary mechanical benefits of this implant system is the internal antirotaional feature of the inner hexagon. The clinical abutments engage almost 3.5mm into the implant. This feature provides confidence and reliability in the prevention of rotation and screw loosening. It also provides ideal strength.
Following almost 4 months of healing, the tissue over the implant sealing scre was carefully removed, Rather than placing a gingival former to help promote healthy and ideally contoured tissue, a ProTect abutment was used. This temporary plastic abutment was prepared in the laboratory using the impression taken at the time of surgery. It was used to support a composite temporary crown. Tissue contours were thus easily controlled while still in the temporary stage (Figure 7 and 8).
Although the temporary restoration was not ideally aesthetic (Figure 9), the opportunity to create a better aesthetic result was present. The interdental papilla was intact and the gingival height appeared acceptable. The patient bleached her teeth during the healing period using an at-home system prescribed by the office.
Following 2 weeks, was the final impression was made using the same technique described. A transfer impression was made of the tissue, which was almost ideal in contour and health. There was minimal bleeding (Figure 10). Note that periapical radiographs are always taken when metal-to-metal components are used to ensure proper fit (figure 11).
The temporary abutment and crown were replaced. Figures 12 and 13 clearly illustrate healthy pink sulcular tissue prior to final abutment placement. Dental laboratories should primarily consider the depth of the soft tissue when creating ideal emergence 0? or 14? angulation and 1-, 2-, 3-, or even 5-mm collar heights are available. In this case, an MH-6 straight abutment with a 1-mm transmucosal extension was used. Note that the abutments can be modified subgingivally to 0.7mm from the top of the implant if necessary. Modification allows for a better emergence profile around the buccal and brings the margin lingually to a desired visual position. The abutments screw was then torqued into position with 20 Ncm of force.
All-ceramic restorations are usually more aesthetic that conventional porcelain-feused-to-metal crowns because they transmit light similarly to natural teeth. Recreating translucency and value is easily accomplished, and excessive opacity is better controled at the cervical third.(3)
In this case, Procera All-Ceram crown was used. The technique required fabrication of a coping densely sinterd, pure aluminum oxide with dental porcelain(4). It provided the necessary strength for the restoration and minimized the amount of unsupported porcelain.
First a thin amount of cement around the marginal edge in side the crown was placed. Any cement can be used because of the opacity of the Procera material. I prefer a softer cement, such as Improv (Steri-Oss Corp), to allow for crown removal in the future if necessary. The Frialit-2 abutments offer the opportunity to use a cemented or a screw-retained crown with a lingual fixation screw.
Figures 14 through 17 illustrate the aesthetic result with a good emergence profile. The various diameters of the implants available and selection of the appropriate abutment provide optimum aesthetics. Single-tooth replacement has become the standard in modern implnatology. The techniques and simplicity of the system enables all general practitioners to offer implant dentistry to their patients.
References:
- Seventh International Friatec Symposium. Int J Oral Maxillofac Implants. 1997;12(4):697-702
- Wijs F. et al. Immediate labial contour restoration for improved esthetics: a radiographic study on bone spliting in anterior single-tooth replacement. Int J Oral Maxillofac Implants. 1997;12(5):686-696.
- Razzoog M, et al. AllCeram crowns for single-replacement implant abutments. J Prosthet. 1997;78(5):486-489.
- Anderson M,et al. A new all-ceramic crown. Acta Odontol Scand. 1993;51:59-64
